So you've decided to get yourself a 3D printer. Particularly a plastic extruder printer (or
FDM for short). Should you build it from scratch or rather buy a kit or a pre-made printer?
I think the first thing you need to decide is whether you want the 3D printer to be the project or if you need a 3D printer for other projects you want to do. If it's the latter I would recommend buying a kit or a pre-made printer since it'll get you up and running quicker and save you hours of frustration. Picking one of the more known brands will also give you a safety net, in the form of support and a fellow user base, if - I mean
when something goes wrong. Skip to the end of the article for my thoughts on buying a kit/pre-made printer.
Should you, however, decide to go down the other rabbit hole and build one from scratch I've compiled a list of my favourite components. For more details check out my previous blog posts. You will need access to a workshop and at least a basic set of tools as well.
Electronics
There's nothing wrong with the old
RAMPS shield and Marlin (firmware) combo, I've been running it for years. On the other hand it can be a bit limiting when running higher speeds as well as non-cartesian printers. The
4XC Smoothieboard should be a good pick although I haven't had the opportunity to try it out myself yet (although I do own one).
As for power the cheapest way is to use an old PC power supply which provides both a 12V and 5V rail. However the heated bed will be a lot faster with a 24V supply. You can find these on ebay.
A
Raspberry Pi for running the print process isn't a wrong choice either since you then don't have to have a full blown PC or Mac hooked up to your printer and you can instead control everything using a nice web interface in
OctoPrint. That said, you can in some cases print directly from an SD card, but that depends on your particular electronics. The Smoothieboard also have an LAN option which should eliminate the need for an external computer.
Motors
Most 3D printers, of the desktop variety are based on Nema 17 stepper motors. These can be found on
ebay. You usually need 3 of these for movement and one for a single extruder.
Extruder / cold end
I've had great success with the Bulldog Extruder, although the Lite version ended up being too weak (even for 1.75mm filament) so I bought a geared Nema 17 motor to go with it. That's why I'll recommend going with the
XL version right away.
Print head / hot end
 |
| E3Dv6 hotend |
My current setup is a
E3D-v6 print head which is an all-metal hotend. I like it quite a bit and it is the one I would recommend, but I've also owned a
J-Head Mk V which I quite liked. The latter "melted" on me so remember adding active cooling if you choose to use one.
The E3D hotend can be tricky to get working properly, but my solution to this was to beef up the extruder (see above) and add lubrication to the filament. This is easy, stick the filament through a small piece of kitchen sponge, before you feed it through the extruder, and drip a couple drops of mineral oil / canola oil on the sponge. This will have the added effect of making sure the filament is dust free which also helps prevent clogging of the nozzle. I would recommend a
holder for the sponge since you don't want it dragged into the extruder :)
On another note printing with 1.75mm filament would, in my opinion, be the way to go for a new printer. Also for first timers start with PLA plastic and work your way up to other, more challenging, plastics from there.
Print bed
If you plan to print PLA I would, however, recommend adding a print surface on top of the heater. You could of course print on glass, Kapton or blue painters tape, but I've had the most success with the
PRINTinZ printer plate so I would recommend checking that out.
 |
| First attempt at creating a heated bed using regular glass and Kanthal wire. |
And yes, I would recommend getting a heated print bed. Although you can print without heating the PRINTinZ plate I have discovered that heating it to around 40C will help lessen warping. I made the heating platform myself, but it's probably easier and safer to get a pre-made one. Here you need to decide if you'll use a 12V or 24V system before buying. Apart from that I don't have much advice to give since you need to find a size that fits your planned printer. A delta printer, for one, would need a round print bed.
Which style of 3D printer to go for
There are several types of designs to choose from. The difference mainly being the mechanics and not so much the hardware, electronics and software. The main contenders are:
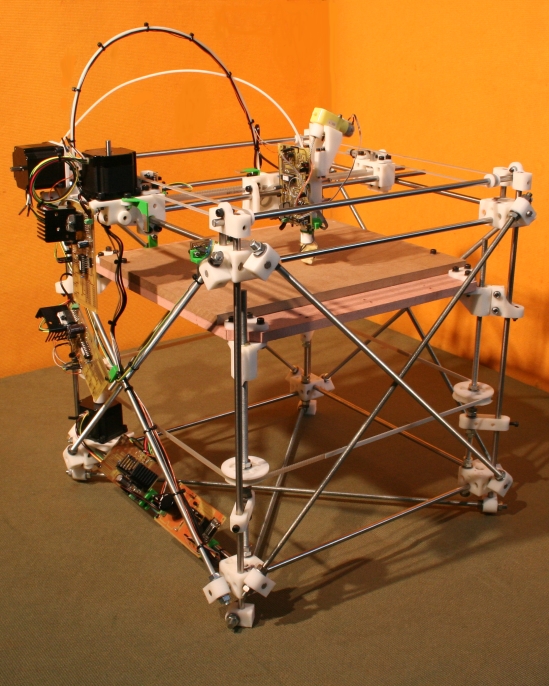 |
| RepRap v1.0 (Darwin) |
Cartesian printers were the first DIY 3D printers to come out and it consists of a moving print-bed (usually the X axis, sideways) as well as the Z-axis (up and down) combined with a print head that moves on the Y axis.
 |
| Rostock delta printer |
Delta printers - based on the
Rostock design came next. Here you have three linear actuators that controls the position of the print head which leaves the object to be printed stationary. Having a very light print head makes these printers extremely fast and they can have a relatively large build area.
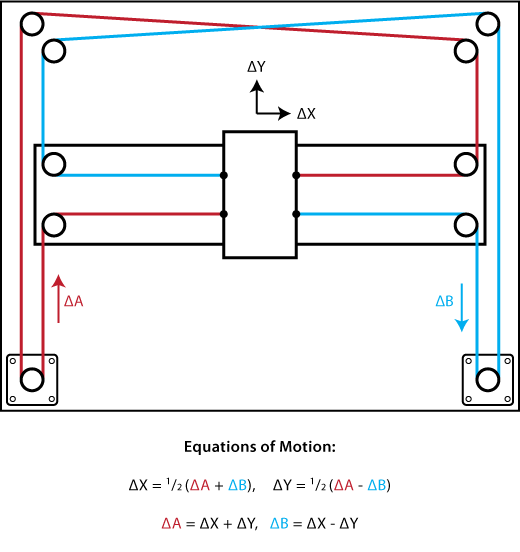 |
| CoreXY reference mechanism. |
H-Bot, Core-XY, or their derivatives, are similar in construction to the cartesian printers, but instead of moving the print bed (apart from the Z axis) you only move the print head - which means faster movement.
Starting from scratch today I would definitely go for one of the latter two designs. There are several reasons, but the main one is print quality. If you at some point need to print very high and thin parts avoiding any movement of the object being printed is good as it will flex and could ultimately come loose from the print surface.
Buying a ready made / kit printer
I have no experience with these printers myself, but I would choose one of these should I order order one myself - which I have in the case of the Fabtotum.
 |
| Fabtotum |
Fabtotum: I ended up ordering one of these back in August when originally researching mechanics for a new printer. I still haven't received it, but I expect it delivered within a couple of months if nothing unforeseen happens. This is a coreXY derivative which also has a 5 axis CNC mill, laser scanner and contact probe. Seems like a solid and thought through design. It arrives fully assembled.
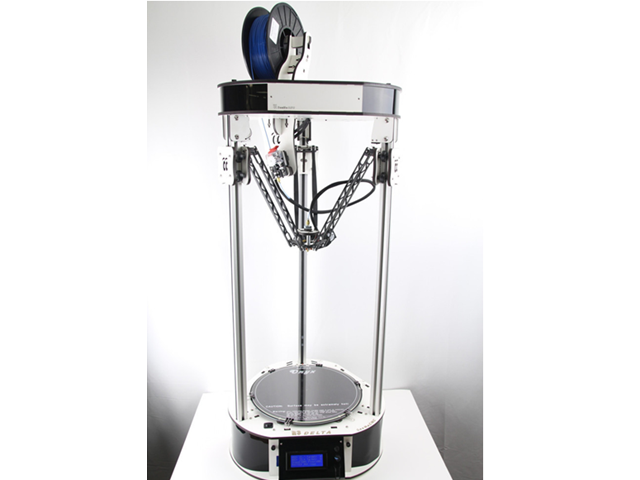 |
| Rostock MAX v2 |
As for a kit / delta printer it currently stands between the
OpenBeam Kossel Pro and the
SeeMeCNC Rostock MAX v2. Both looks good on paper and the latter one comes in a bit cheaper at $999 US.
Disclaimer
These are my personal opinions and experiences. For all I know some of them might be flat out wrong so any corrections or additions will be appreciated.


