Showing posts with label Heated platform. Show all posts

Sunday, March 22, 2015

Notes on getting a 3D printer

So you've decided to get yourself a 3D printer. Particularly a plastic extruder printer (or FDM for short). Should you build it from scratch or rather buy a kit or a pre-made printer?

I think the first thing you need to decide is whether you want the 3D printer to be the project or if you need a 3D printer for other projects you want to do. If it's the latter I would recommend buying a kit or a pre-made printer since it'll get you up and running quicker and save you hours of frustration. Picking one of the more known brands will also give you a safety net, in the form of support and a fellow user base, if - I mean when something goes wrong. Skip to the end of the article for my thoughts on buying a kit/pre-made printer.

Should you, however, decide to go down the other rabbit hole and build one from scratch I've compiled a list of my favourite components. For more details check out my previous blog posts. You will need access to a workshop and at least a basic set of tools as well.

Electronics

There's nothing wrong with the old RAMPS shield and Marlin (firmware) combo, I've been running it for years. On the other hand it can be a bit limiting when running higher speeds as well as non-cartesian printers. The 4XC Smoothieboard should be a good pick although I haven't had the opportunity to try it out myself yet (although I do own one).

As for power the cheapest way is to use an old PC power supply which provides both a 12V and 5V rail. However the heated bed will be a lot faster with a 24V supply. You can find these on ebay.

A Raspberry Pi for running the print process isn't a wrong choice either since you then don't have to have a full blown PC or Mac hooked up to your printer and you can instead control everything using a nice web interface in OctoPrint. That said, you can in some cases print directly from an SD card, but that depends on your particular electronics. The Smoothieboard also have an LAN option which should eliminate the need for an external computer.

Motors


Most 3D printers, of the desktop variety are based on Nema 17 stepper motors. These can be found on ebay. You usually need 3 of these for movement and one for a single extruder.

Extruder / cold end


I've had great success with the Bulldog Extruder, although the Lite version ended up being too weak (even for 1.75mm filament) so I bought a geared Nema 17 motor to go with it. That's why I'll recommend going with the XL version right away.

Print head / hot end

E3Dv6 hotend
My current setup is a E3D-v6 print head which is an all-metal hotend. I like it quite a bit and it is the one I would recommend, but I've also owned a J-Head Mk V which I quite liked. The latter "melted" on me so remember adding active cooling if you choose to use one.

The E3D hotend can be tricky to get working properly, but my solution to this was to beef up the extruder (see above) and add lubrication to the filament. This is easy, stick the filament through a small piece of kitchen sponge, before you feed it through the extruder, and drip a couple drops of mineral oil / canola oil on the sponge. This will have the added effect of making sure the filament is dust free which also helps prevent clogging of the nozzle. I would recommend a holder for the sponge since you don't want it dragged into the extruder :)

On another note printing with 1.75mm filament would, in my opinion, be the way to go for a new printer. Also for first timers start with PLA plastic and work your way up to other, more challenging, plastics from there.

Print bed

If you plan to print PLA I would, however, recommend adding a print surface on top of the heater. You could of course print on glass, Kapton or blue painters tape, but I've had the most success with the PRINTinZ printer plate so I would recommend checking that out.

First attempt at creating a heated bed using regular glass and Kanthal wire.
And yes, I would recommend getting a heated print bed. Although you can print without heating the PRINTinZ plate I have discovered that heating it to around 40C will help lessen warping. I made the heating platform myself, but it's probably easier and safer to get a pre-made one. Here you need to decide if you'll use a 12V or 24V system before buying. Apart from that I don't have much advice to give since you need to find a size that fits your planned printer. A delta printer, for one, would need a round print bed.

Which style of 3D printer to go for

There are several types of designs to choose from. The difference mainly being the mechanics and not so much the hardware, electronics and software. The main contenders are:
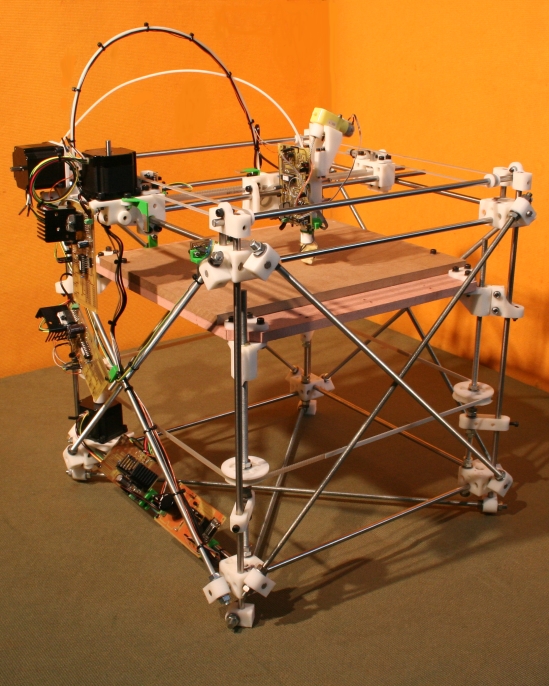
RepRap v1.0 (Darwin)
Cartesian printers were the first DIY 3D printers to come out and it consists of a moving print-bed (usually the X axis, sideways) as well as the Z-axis (up and down) combined with a print head that moves on the Y axis.

Rostock delta printer
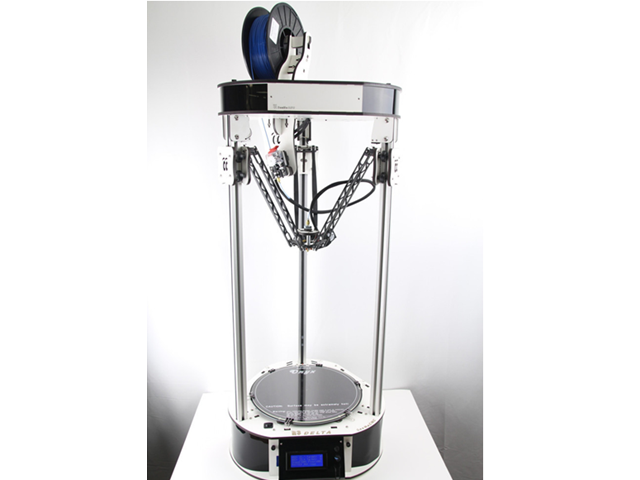
Delta printers - based on the Rostock design came next. Here you have three linear actuators that controls the position of the print head which leaves the object to be printed stationary. Having a very light print head makes these printers extremely fast and they can have a relatively large build area.


CoreXY reference mechanism.
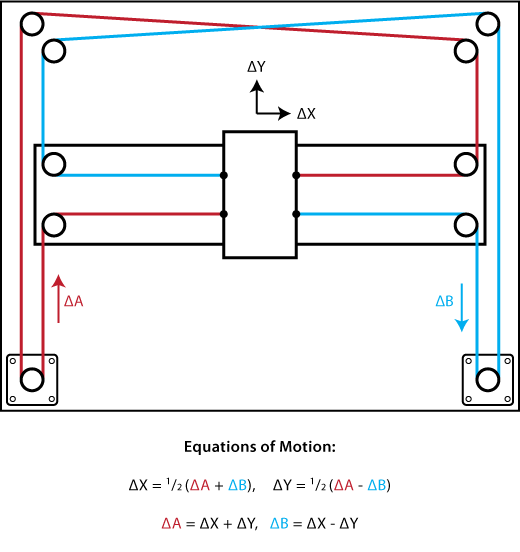
H-Bot, Core-XY, or their derivatives, are similar in construction to the cartesian printers, but instead of moving the print bed (apart from the Z axis) you only move the print head - which means faster movement.

Starting from scratch today I would definitely go for one of the latter two designs. There are several reasons, but the main one is print quality. If you at some point need to print very high and thin parts avoiding any movement of the object being printed is good as it will flex and could ultimately come loose from the print surface.

Buying a ready made / kit printer

I have no experience with these printers myself, but I would choose one of these should I order order one myself - which I have in the case of the Fabtotum.

Fabtotum
Fabtotum: I ended up ordering one of these back in August when originally researching mechanics for a new printer. I still haven't received it, but I expect it delivered within a couple of months if nothing unforeseen happens. This is a coreXY derivative which also has a 5 axis CNC mill, laser scanner and contact probe. Seems like a solid and thought through design. It arrives fully assembled.

Rostock MAX v2
As for a kit / delta printer it currently stands between the OpenBeam Kossel Pro and the SeeMeCNC Rostock MAX v2. Both looks good on paper and the latter one comes in a bit cheaper at $999 US.

Disclaimer

These are my personal opinions and experiences. For all I know some of them might be flat out wrong so any corrections or additions will be appreciated.

Friday, August 24, 2012

SUMPOD Heated Build Platform Part 2

I've been using the last week to put together "Heated Build Platform Mark II" consisting of aluminum sheet instead of glass. As I mentioned in my previous post I had an old Apple Pro cabinet where the side cover can be taken off easily. Being 3mm thick makes it perfect for this project.

Only negative thing was no access to a workshop or proper power tools...

I ended up using the non-metal wood hand saw.
Having read somewhere that it is possible to cut aluminum with blades meant for wood I though why not give it a try with my existing equipment.

Marked, taped and ready...
The saw was a cheapo so no big loss if it didn't work out - which it did :) I can't see any damage on the blade afterwards at least. Sawing aluminum this way is hard work so I won't recommend it if you have an alternative though.

New vs. old print bed.
Using the old platform as a template made it easier to drill holes in the right places etc. I made sure to tape the surface with masking tape first and to clamp the aluminum between two pieces of wood to avoid splinters. Sanded over all the edges with fine grit sanding paper afterwards.

Test fit.
Not shown here I made sure to test the heating functionality thoroughly before threading the wires and installing the platform.

Aluminum is a great heat-spreader, insuring pretty even temperature over the whole surface so that's great! Using a metal platform is not without it's drawbacks though. There's ample opportunity to electrocute yourself if you're not careful. Therefore I added two layers of Kapton to the underside before laying down the heat-wire. I might ground the plate at some point, but I'm not too worried since the platform will be warm when the power is on so I really don't want to touch it when it's active anyway.

The shielding on the wires I used are good up to 90C, which is more than enough for PLA, but If at some point I'm going to print ABS I probably have to rework that part.

Wired, levelled and ready for first print.
My second thermistor (RH16-4A104GB from MMC) worked out much better as well, being off by only one degree C. More than good enough for my purposes. I installed it roughly in the middle of the underside of the platform directly in contact with the aluminum and sealing the whole thing with Kapton.

Made sure there was enough wire to avoid it getting stuck or ripping anything loose.
Having made a few test prints there's no doubt the heated surface makes a huge difference in making the PLA stick to the surface. I haven't had one false start. That is, the plastic sticks on first try every time. I've had a couple of prints where very thin details becoming unstuck during the print, but for the most part it's been extremely good.

This time around I've been testing Slic3r which I like a lot for it's simplicity compared to Skeinforge - it's a lot faster as well being coded in C++. It seem to be a bit courser though. When it comes to fine detail and thin walls it sometimes leaves gaps, even when I have selected solid fill. That's something that I have to figure out.

The next issue to solve now is the feeder/printhead mechanism. I had the print head clog up three times the last couple of days and I'm still trying to figure out why. It seems to only happen on longer printruns and my initial guess is that there's a combination of several parts getting too hot. I've been playing around with increasing the filament extrusion-multiplier as well so there's a chance that's the reason. More testing needed :)

Just in case I ordered a new, and more compact, print head last night from QU-BD. Hopefully I will be able to use my existing Nema 17 stepper on this one. The bonus is that I eliminate the bowden tube and any slack in that type of setup. There is a disadvantage in moving more weight onto the y-axis so I'll have to test before saying anything for sure, but I might have to move the y-axis motor to the back of the printer frame and re-rig the belt.

So far I've been using the Sprinter firmware, but I think my next project will be to upgrade to Marlin since I've heard it's a bit better quality wise.

Sunday, August 12, 2012

SUMPOD Heated Build Platform Retrofit

There's not been much progress on my 3D printer during the summer months since I haven't been much home, but this last week I've had a bit of progress.

Where I left off before summer showed I had some challenges to overcome with the build quality.

Failed prints
Mostly I've been playing around with the settings in Skeinforge - which is a hugely complex software for slicing up the 3D model and preparing the g-code for the printer. Using Airtrippers PLA settings as a starting point I got pretty good quality for the bottom and side walls, but the filling still gives me issues. As seen in the picture the print head tears up the fine inner walls in the model and produces big, gaping holes that the printer can't close when doing the top layer at the end.

I suspect this mainly is caused by to low flow of material on the interior walls, but I haven't been able to find the right setting to increase this yet. More testing needed. I might go back to scratch and test with coarser settings, i.e. thicker layers, to see if that helps as well since part of the problem is that the previous layer stick to the printer head.

Another, frustrating, issue is that the printer seems to print when moving from one position at one side of the model, to another at the other side. This leaves a slightly higher stripe of plastic that creates non uniform surface on the next layer. This can be seen particularly good at the center object on the bottom layer on the picture above. I don't think it has to do with residue plastic continuing to ooze from the print head since it seems to consistent for that - but I could always be wrong.

Getting the the print to stick to the build platform has also been challenging. At first I used the provided MDF platform with blue masking tape. Depending on the temperature in the room I had to restart the build 5-10 times before the PLA would stick properly. Increasing the temperature of the print head above 185 degrees C does not help with the brand of PLA I'm using at the moment. I've also played around with increasing/decreasing the distance between the print head and the build platform up until the point of the filament jamming.

Changing the build platform to use glass seem to help a bit - when heating the glass with a hair dryer directly before starting a print. Still takes quite a few tries to have it stick. Seems like the printer doesn't feed enough material at the beginning as well. I'm printing without a raft since I can't be bothered to remove it afterwards ;)

Glass picture frame from Clas Ohlson. Cheap at just over €1.
Still covering the glass with blue painters tape
Seeing heat was the way to go - a heated build platform was the next logical step. I ordered a huge (20 cm wide) roll of Kapton tape from e-bay to avoid having to overlap when covering the platform. Thinking Nicrome wire easy to source I didn't order any, but I couldn't be more wrong. This is one of those things that's really hard to get hold of here in Norway for some reason. After googling and trawling forums I finally found a substitute in a forum thread about styrofoam cutters; Kanthal wire. With nearly the same specs and even surpassing some - like handling very high heat - it seemed ideal.

Glass printer bed
Measuring the area the print head could cover was a bit disappointing. As can be seen from the picture above where I have cut the glass to match. Except for about 5mm extra on the left and right side that's about it (14x15cm). I had to cut one of the corners to make room for the leveling adjustment bolt.

Trying to keep the three wires (in parallel) at the same length of 460mm was a bit of a challenge since not all the traces would be identical in form.

I started by adding a layer of Kapton to the top layer of the glass plate and then proceeded to tape the Kanthal wire to the bottom with strips of Kapton.

Almost done, just need to fasten the wires to the power
source...
Using non-tempered glass, knowing full well that the glass probably would crack during repeated heating and cooling, I still had to try it out. Sourcing, and cutting, this kind of glass is another thing that's not easy to get done apparently. However; having the glass crack during assembly was a disappointment, but again  entirely my own fault being careless with a screwdriver.

I had to try heating it up anyway so I hooked up the (converted) PC power supply and turned on the juice. This taught me two things; first of all - the thermistor (temperature sensor) was the wrong type as it showed 20 degrees higher temperature than it actually was. Fortunately I have another thermistor (also rated at 100K) that I'll try next. Secondly I discovered that the heating was extremely effective - yay! I didn't time it, but it felt like between 10 and 15 seconds between I turned on the power and the platform measured 60 degrees (taken with my heat sensor gun). Not having to heat the whole print bed, but only the actual area needed, probably helped here. The glass also only has a thickness of 2mm. Hearing a loud crack made me turn of the power pretty darn quick though ;)

Side panel of an old G5 Mac Pro... use what you've got :)
So what's next? The Mac Pro cabinet is all aluminum and has an easy removable side panel with 3mm thickness. Adding one or two layers of Kapton tape to avoid a short - before adding the heating wire should make it quite ideal for my purposes. Bring on the hack saw! :)